
Keynote Remote with Mac OS X
January 12, 2015I've always liked the idea of using my iPhone as a remote control for PowerPoint presentations but have never found a good iOS application to do the trick. However, since I use a MacBook Pro as my work computer which now comes with Keynote, I've found that Keynote Remote works wonders! The iOS Keynote Remote isn't a separate application anymore though, it is now built into the iOS Keynote application. This tutorial will show you how to pair an iOS Keynote with your Mac OS X Keynote even without Internet access or when the WiFi network won't allow the pair to occur.
Requirements
- A Mac OS X computer with Keynote 6.1 or later.
- An iOS device with Keynote 2.1 or later.
Easy Mode
This tutorial is geared toward an edge case when you want to pair the Mac OS X Keynote with the iOS device Keynote since only WiFi is allowed in order to use Keynote Remote. If you have 2 iOS devices you can use either WiFi or Bluetooth for the pairing, but Mac OS X Keynote does not allow Bluetooth pairing with an iOS device.
Just to Be Clear
The below table describes the pairing situations and if they work or not:
| Device 1 | Device 2 | Type | Allowed to Pair |
|---|---|---|---|
| Mac OS X | iOS Device | Same WiFi Network | Yes |
| Mac OS X | iOS Device | Bluetooth | No |
| iOS Device | iOS Device | Same WiFi Network | Yes |
| iOS Device | iOS Device | Bluetooth | Yes |
For instructions on the allowed cases you can view Apple's Support Site for more detailed instructions. Here I want to focus on the case when you can't pair your Mac OS X device and the iOS device.
Edge Case
I found that I could not pair my MacBook Pro with my iPhone even when they were on the same WiFi network. I think there may have been some firewall rules on the network that prevented the pairing to occur. Since Bluetooth doesn't work, this meant I wouldn't be able to pair. However, I found a tutorial for an older version of Keynote that worked and wanted to share a more written out tutorial rather than a video and with the most updated versions.
This method allows you to set up a network on your Mac OS X device and connect to it with your iOS device thus creating an ad-hoc network to communicate and pair the Keynote applications. Once set, you can present to your heart's desire!
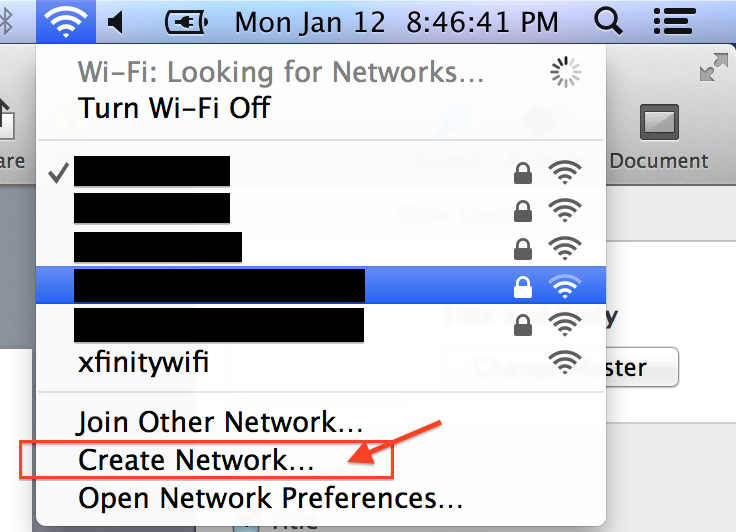
Step 1: Set Up the Network
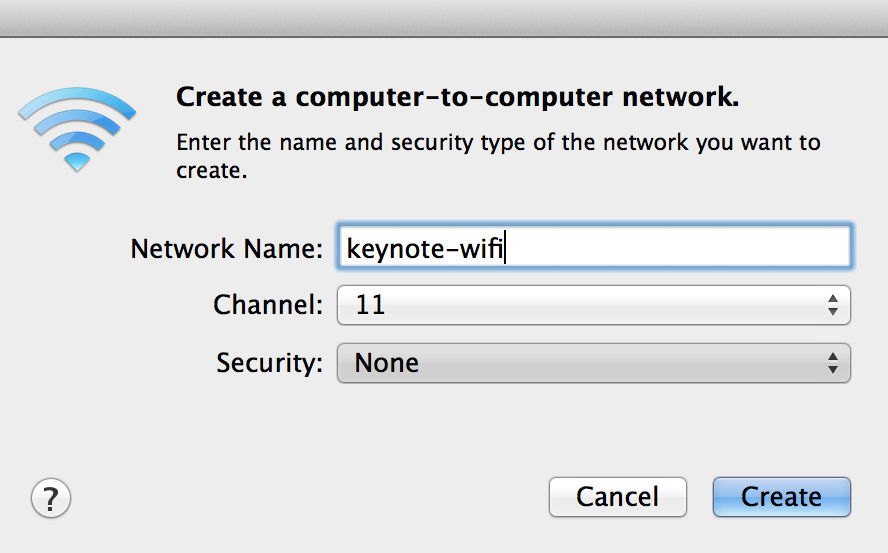
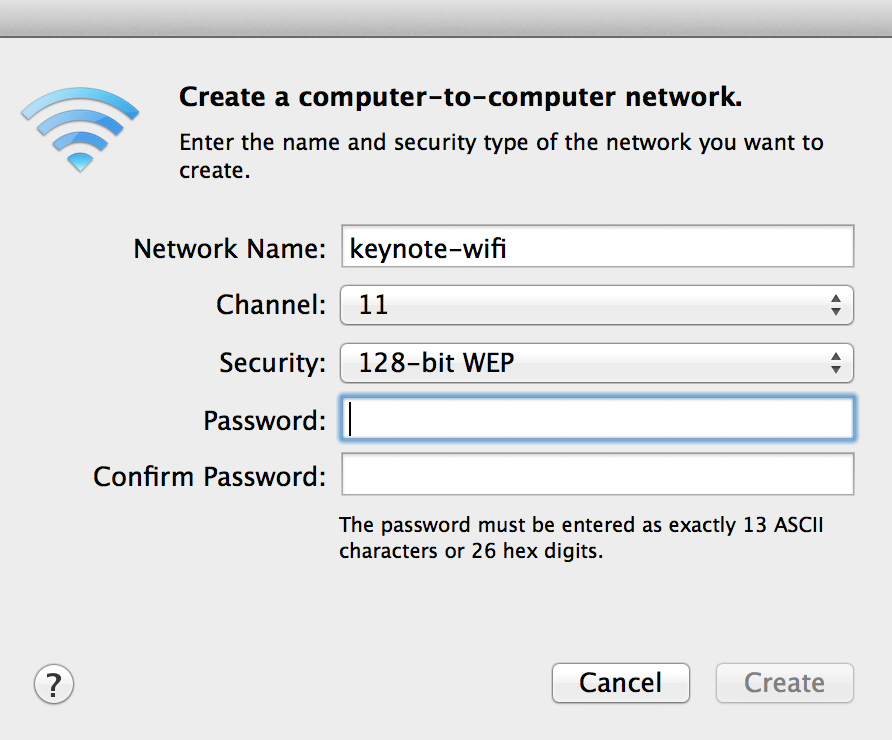
First you'll want to go to your network settings (in top right corner of the taskbar) and select "Create Network ..."
From there a pop-up asks for the network name that you want to create. I called mine "keynote-wifi" and then I added security as 128-bit WEP with a password. Hit "Create" and the network should be created.
Step 2: Join the Network
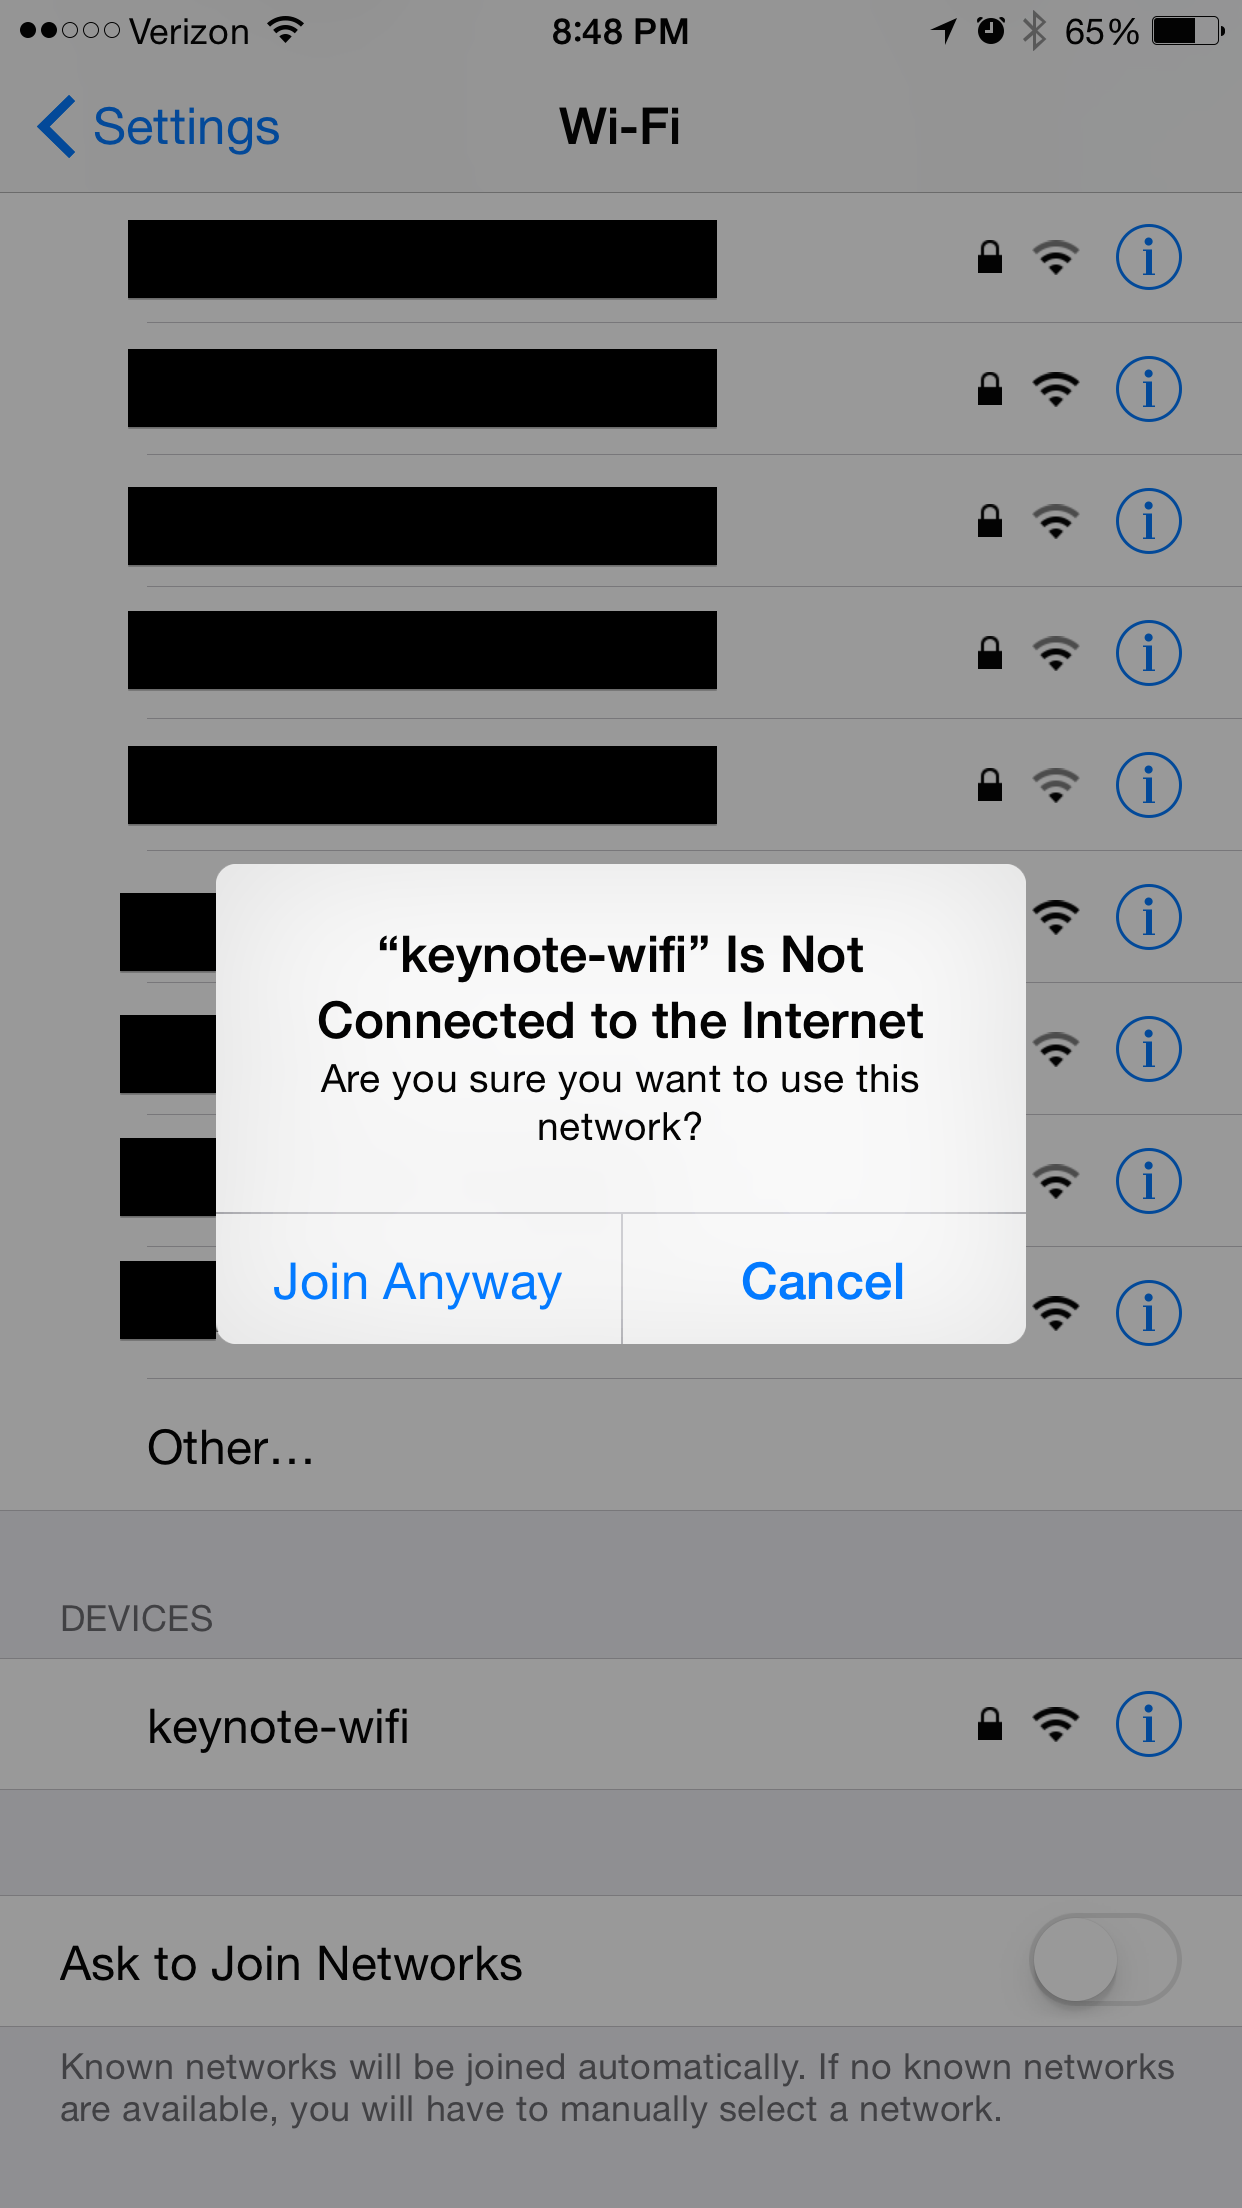
On your iOS device you'll now need to join the network that you just created. Go into your "Settings > WiFi" settings and scroll down to the "Devices" section where you should see "keynote-wifi" or whatever name you used for the network that you created in Step 1.
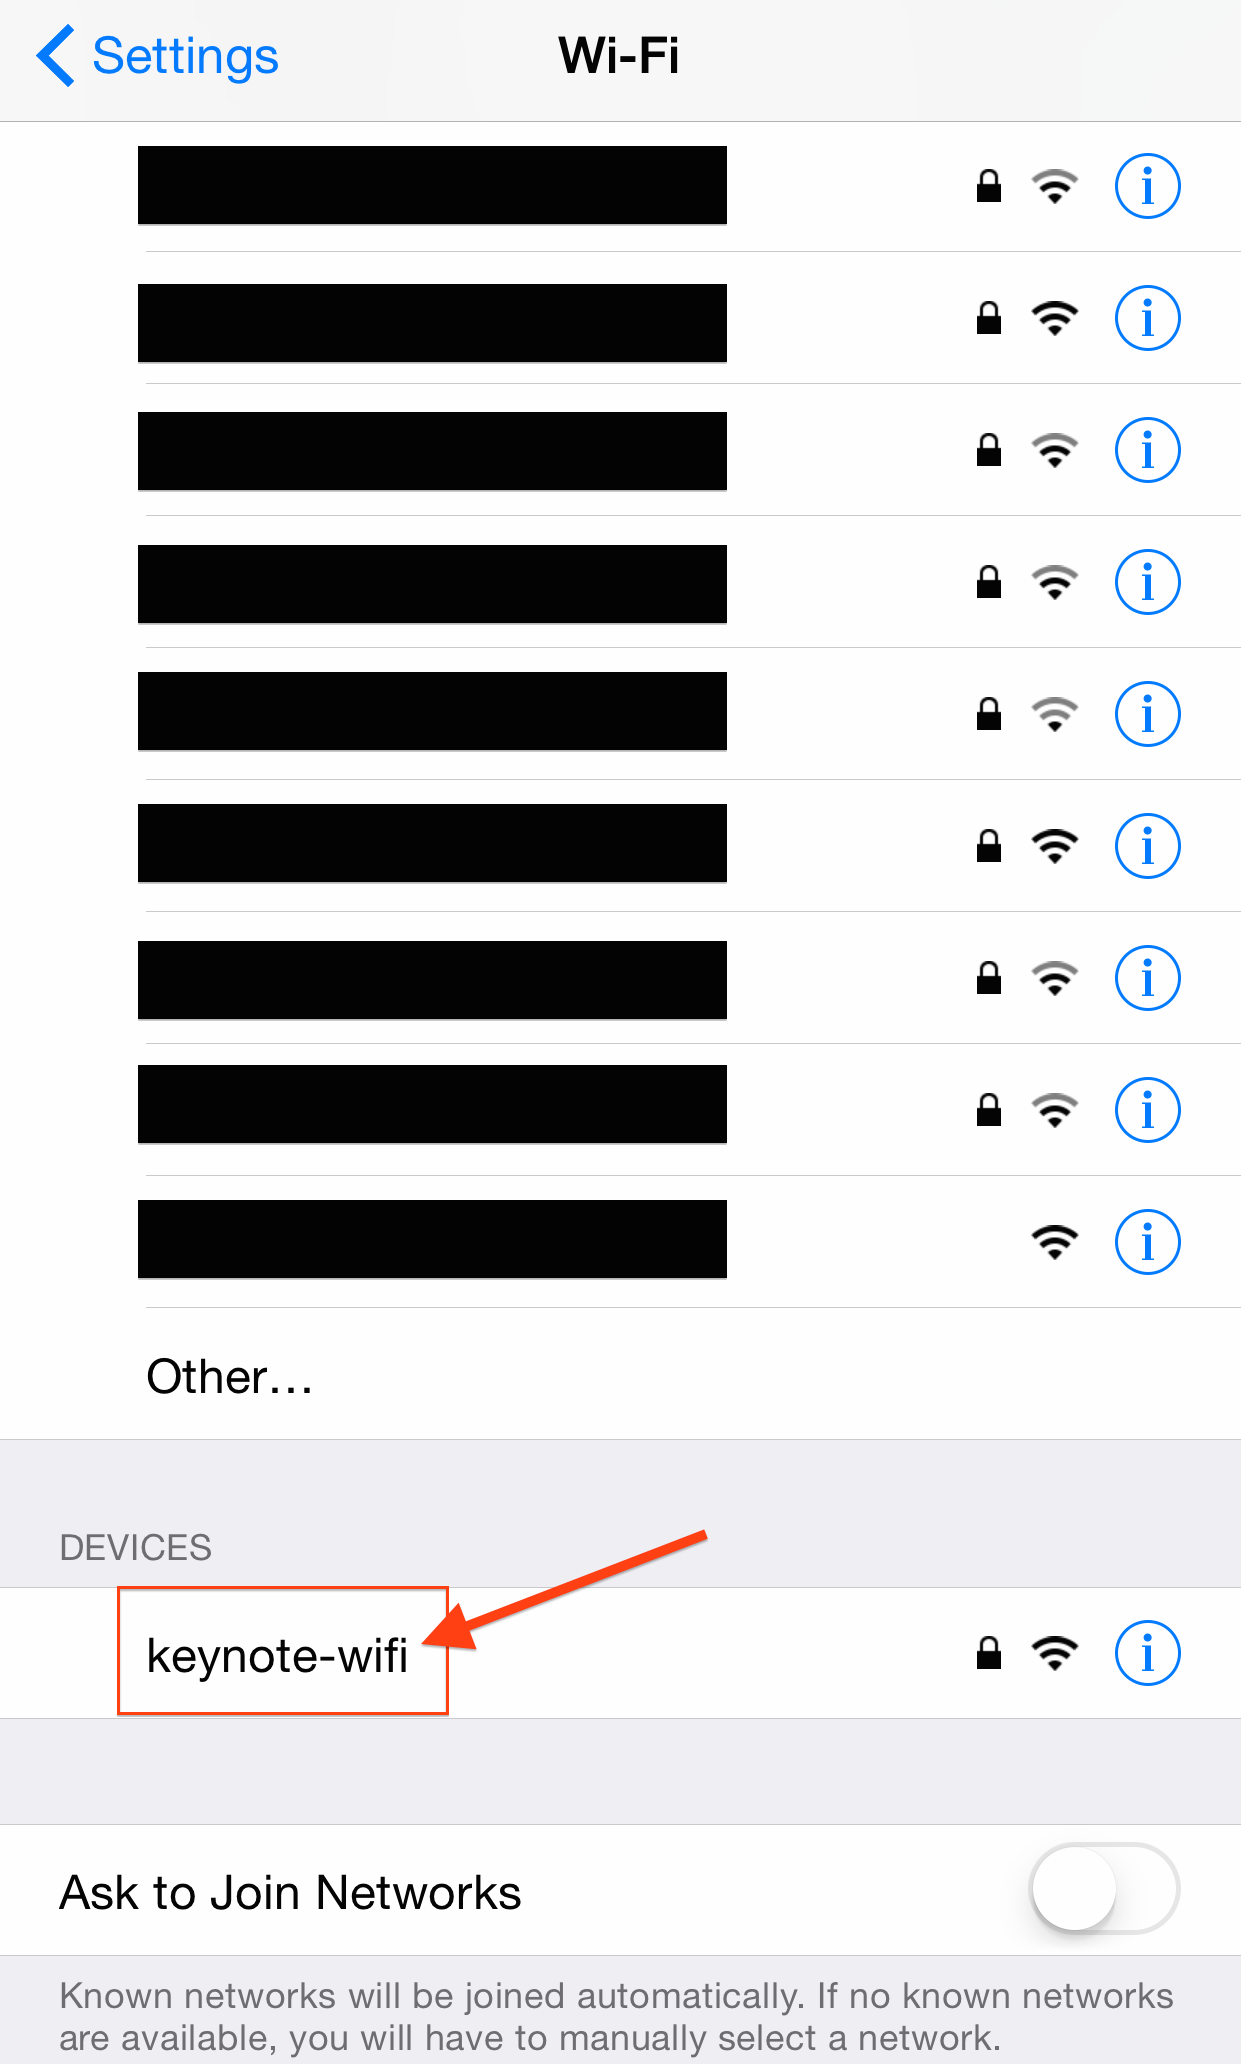
It'll ask if you want to join the network even though it doesn't have access to the Internet. This is completely fine! We just need the iOS device to be connected to your Mac (no Internet required). So hit "Join Anyway". If you have Internet shared then that is completely fine and you'll see that you need to enter the password.
Step 3: Start iOS Keynote
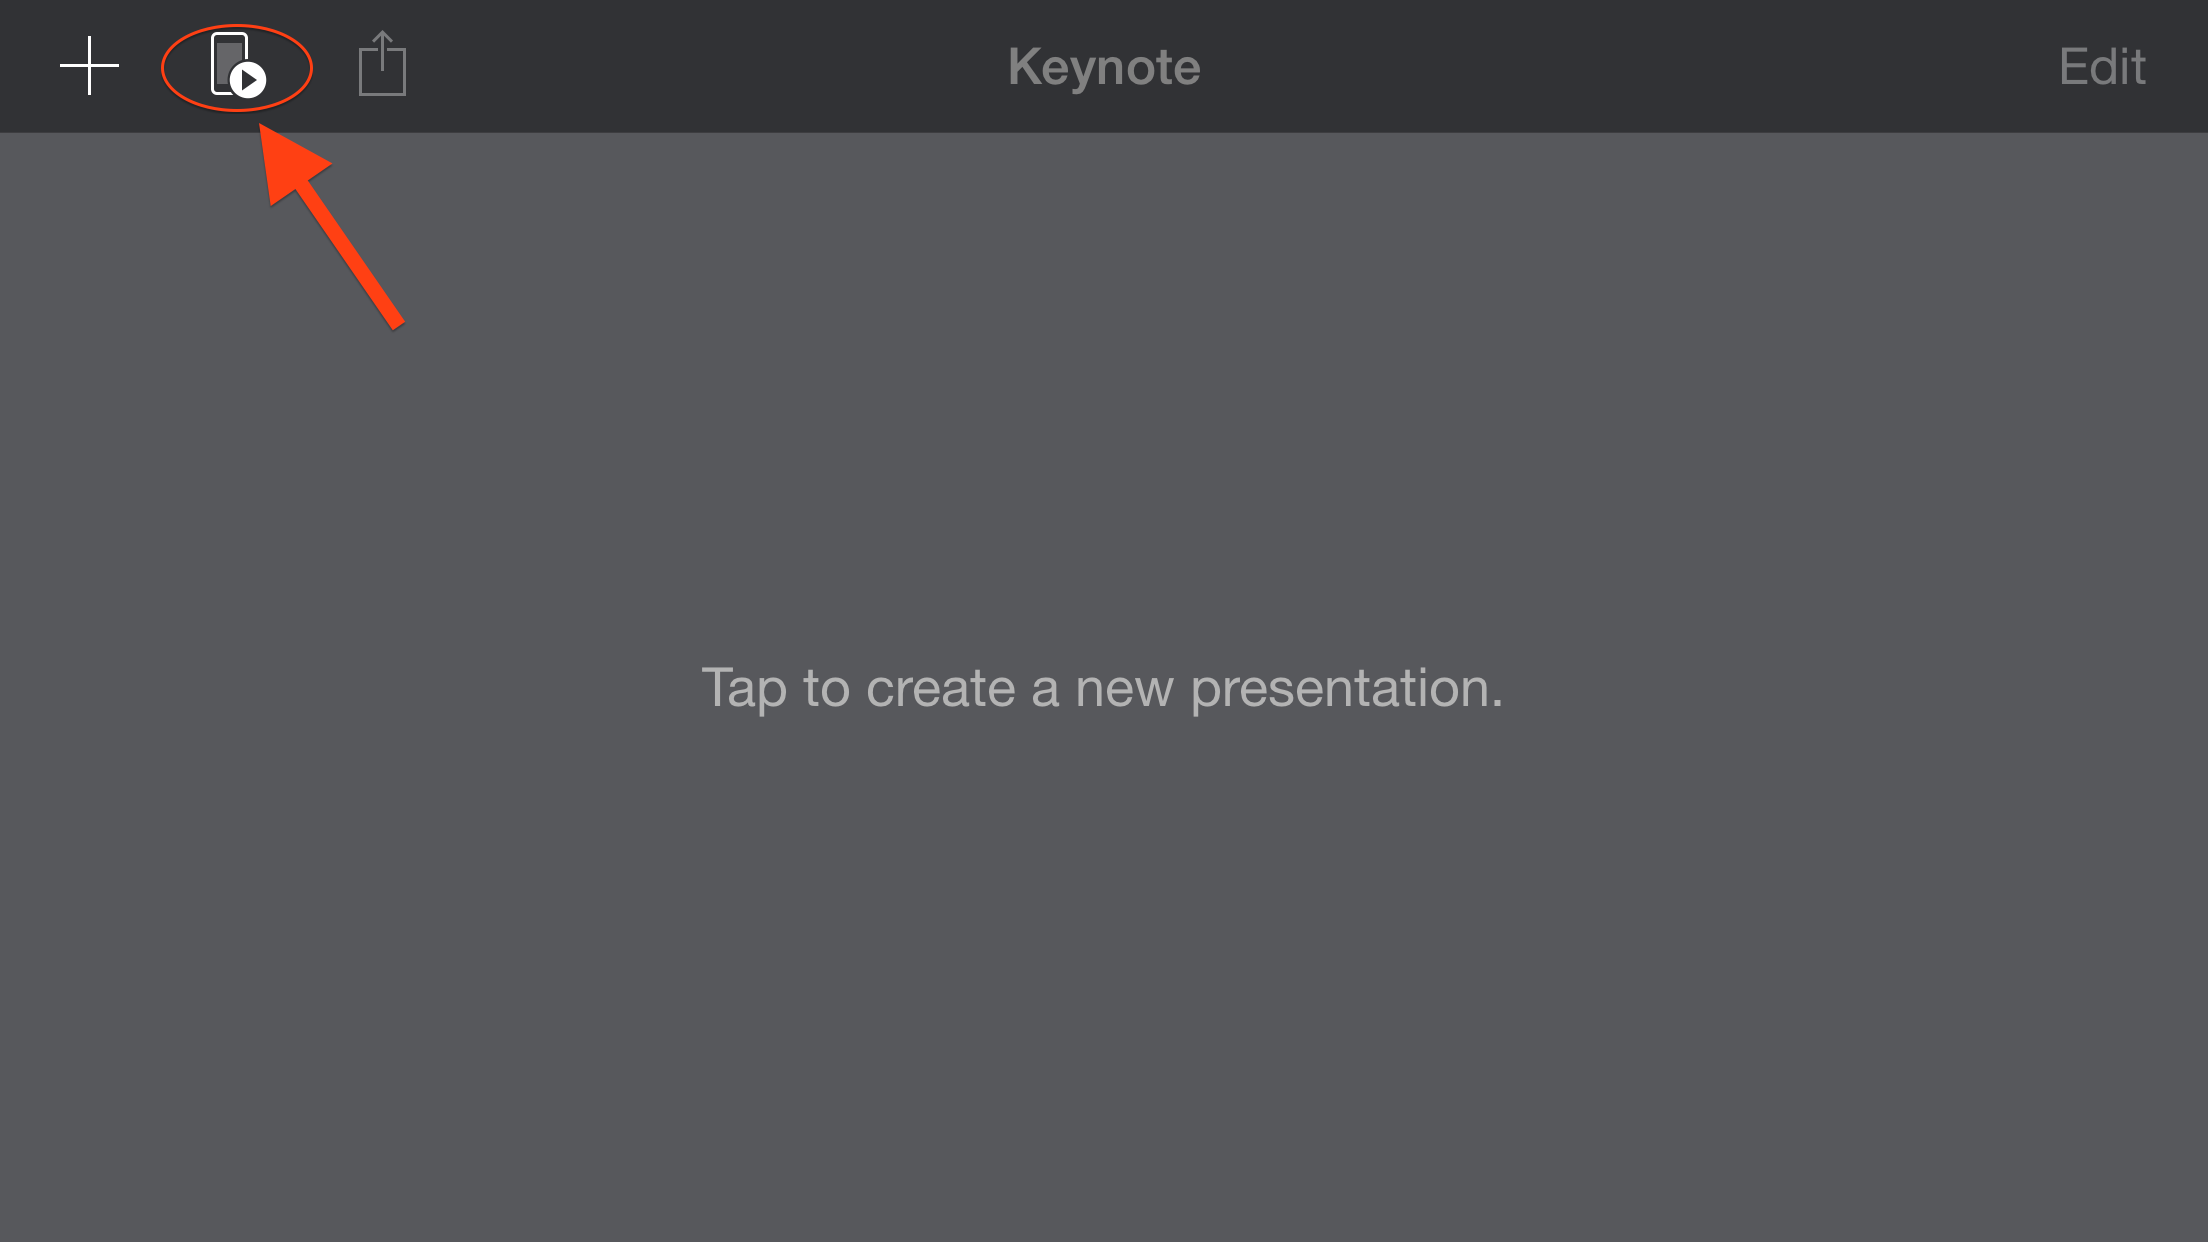
Next, you'll need to start the iOS Keynote application. After going through possible start-up screens, you should see a dark screen that asks you to "Tap to create a new presentation." Instead of tapping the screen, tap the icon in the top left corner that looks like an iPhone with a play button icon. This is the Keynote Remote part of the application.
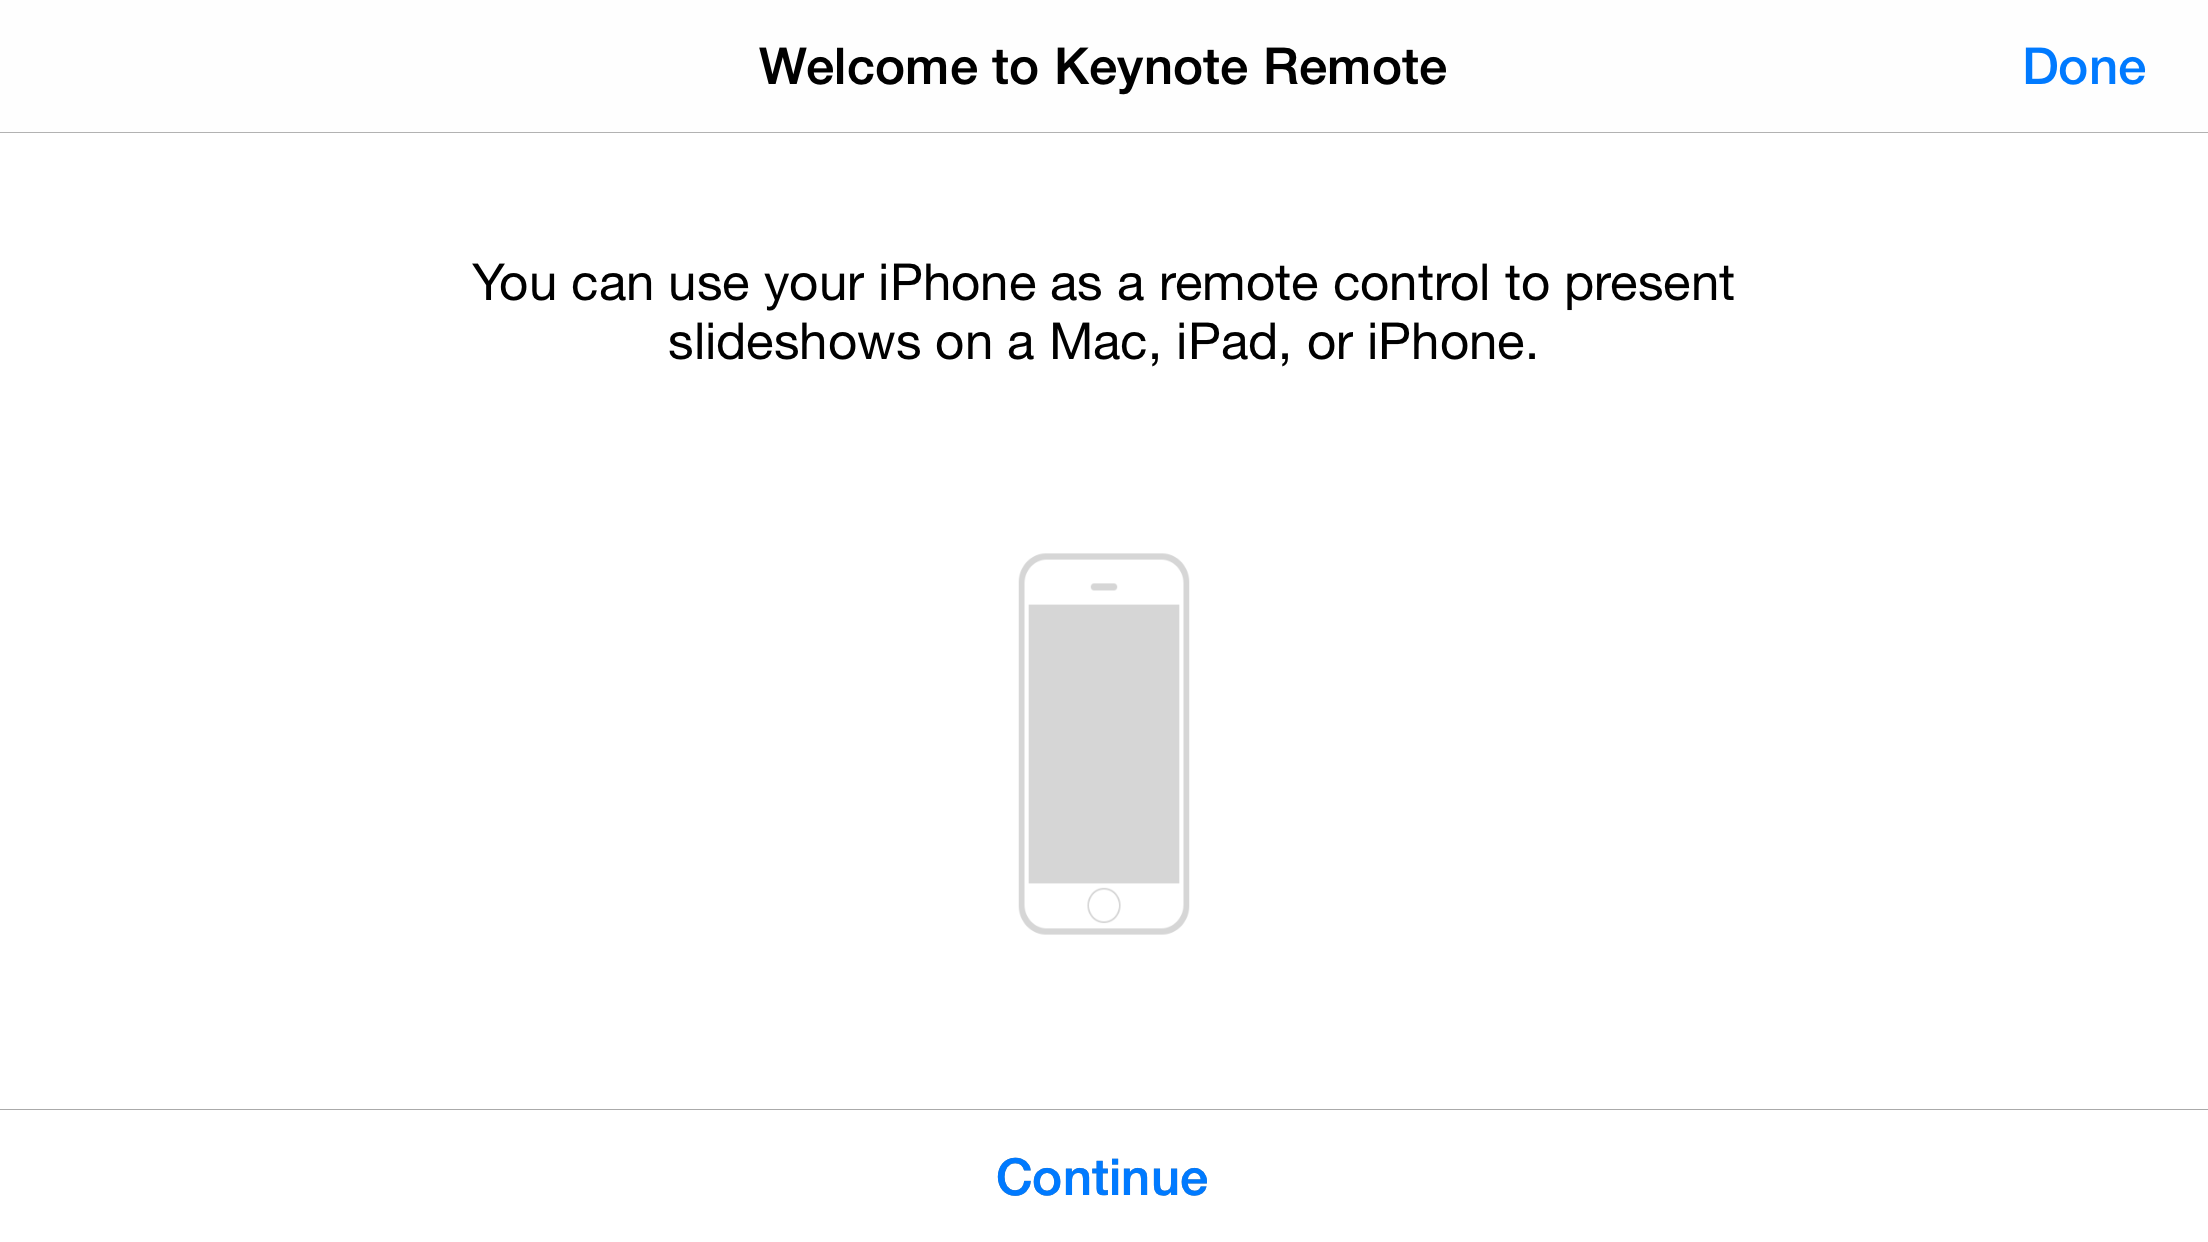
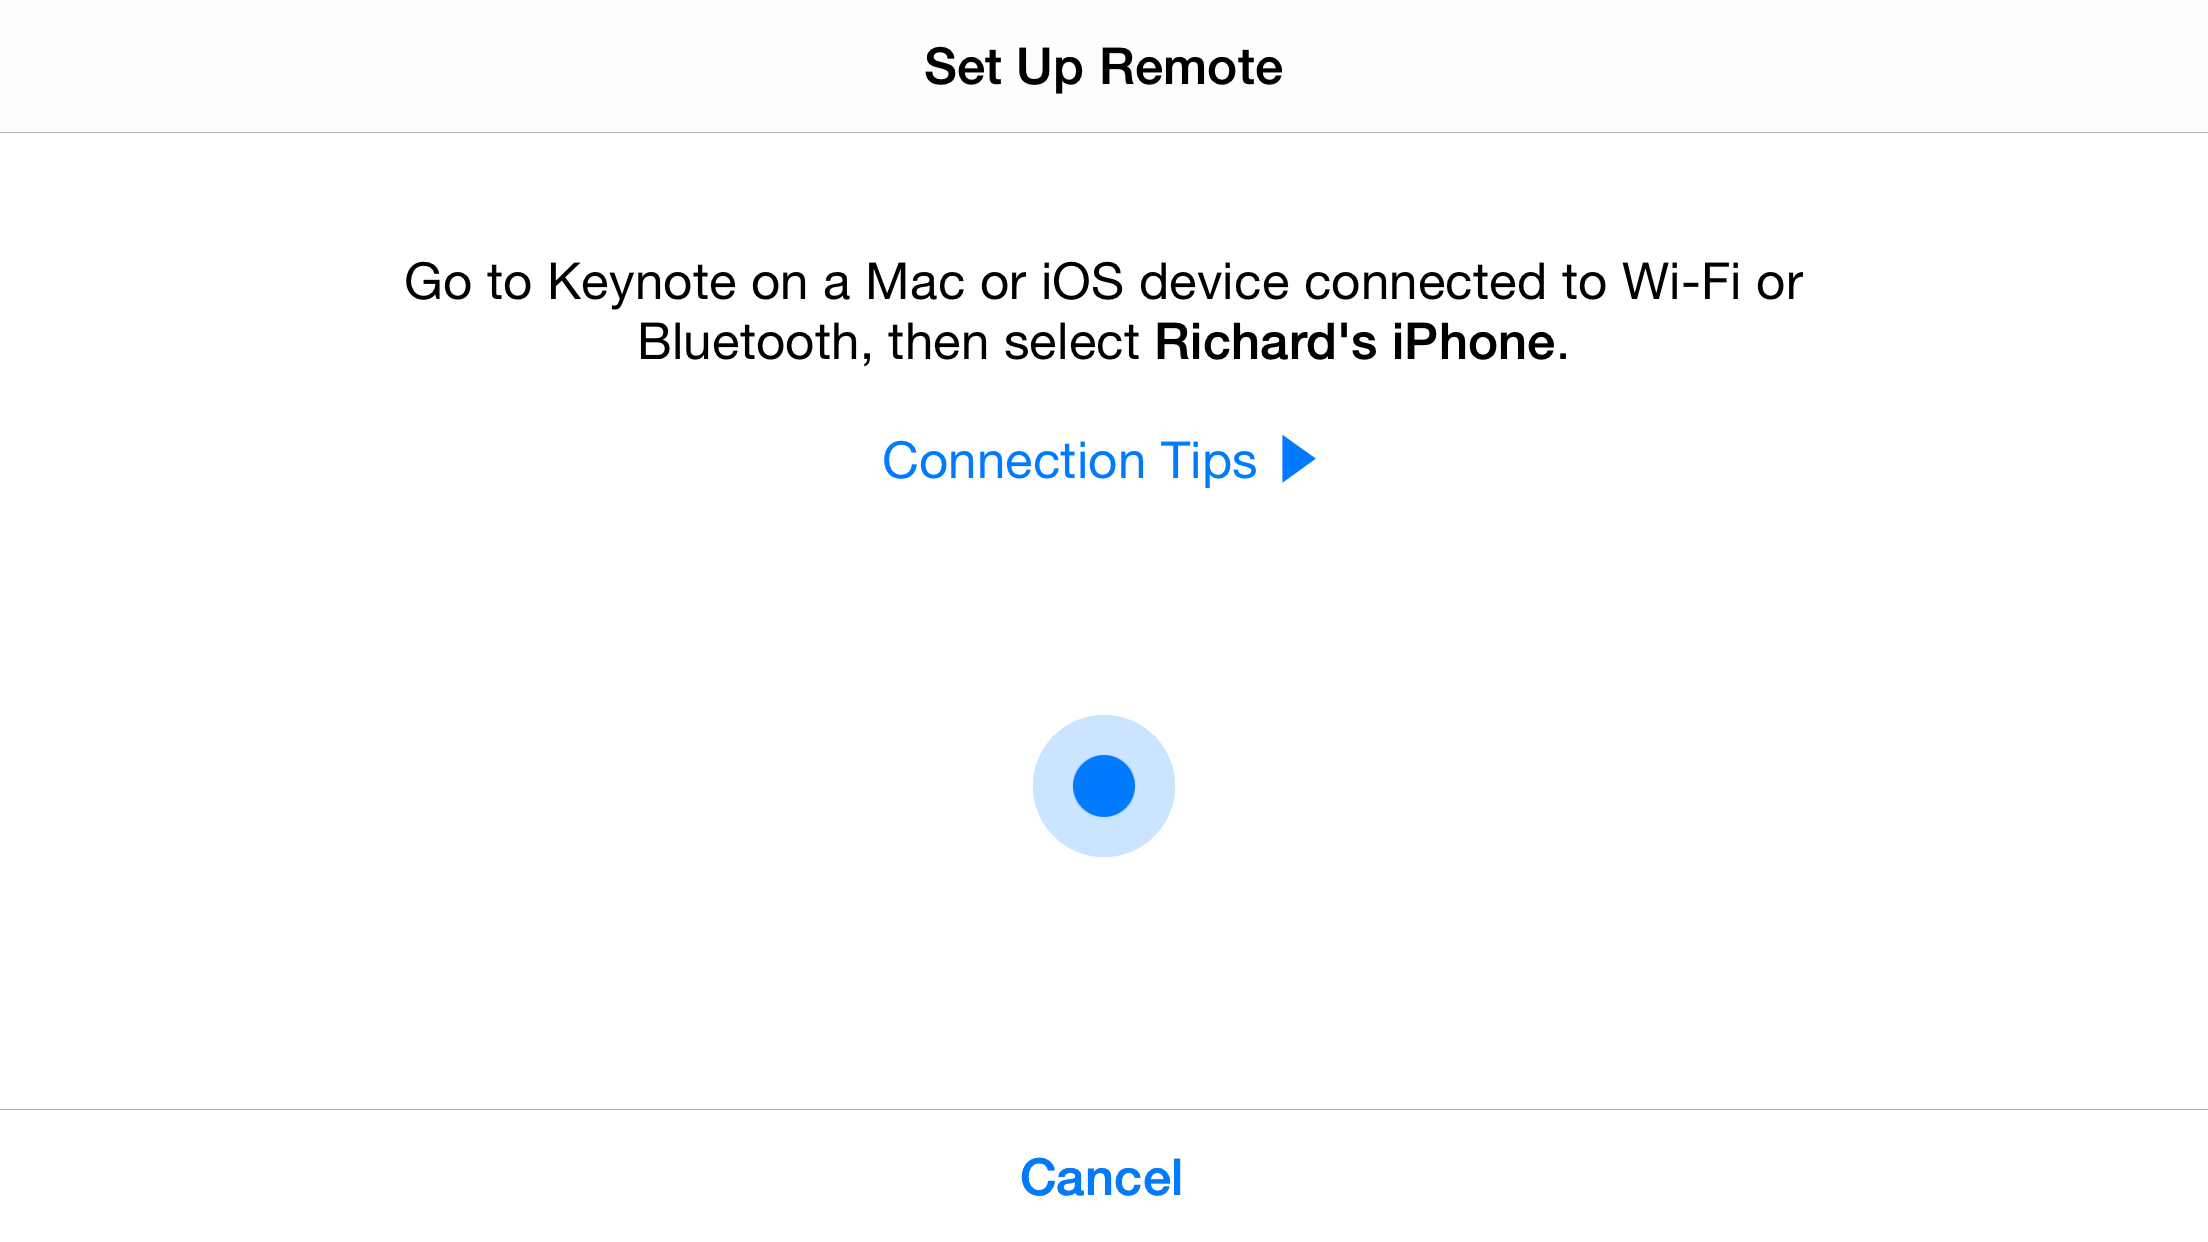
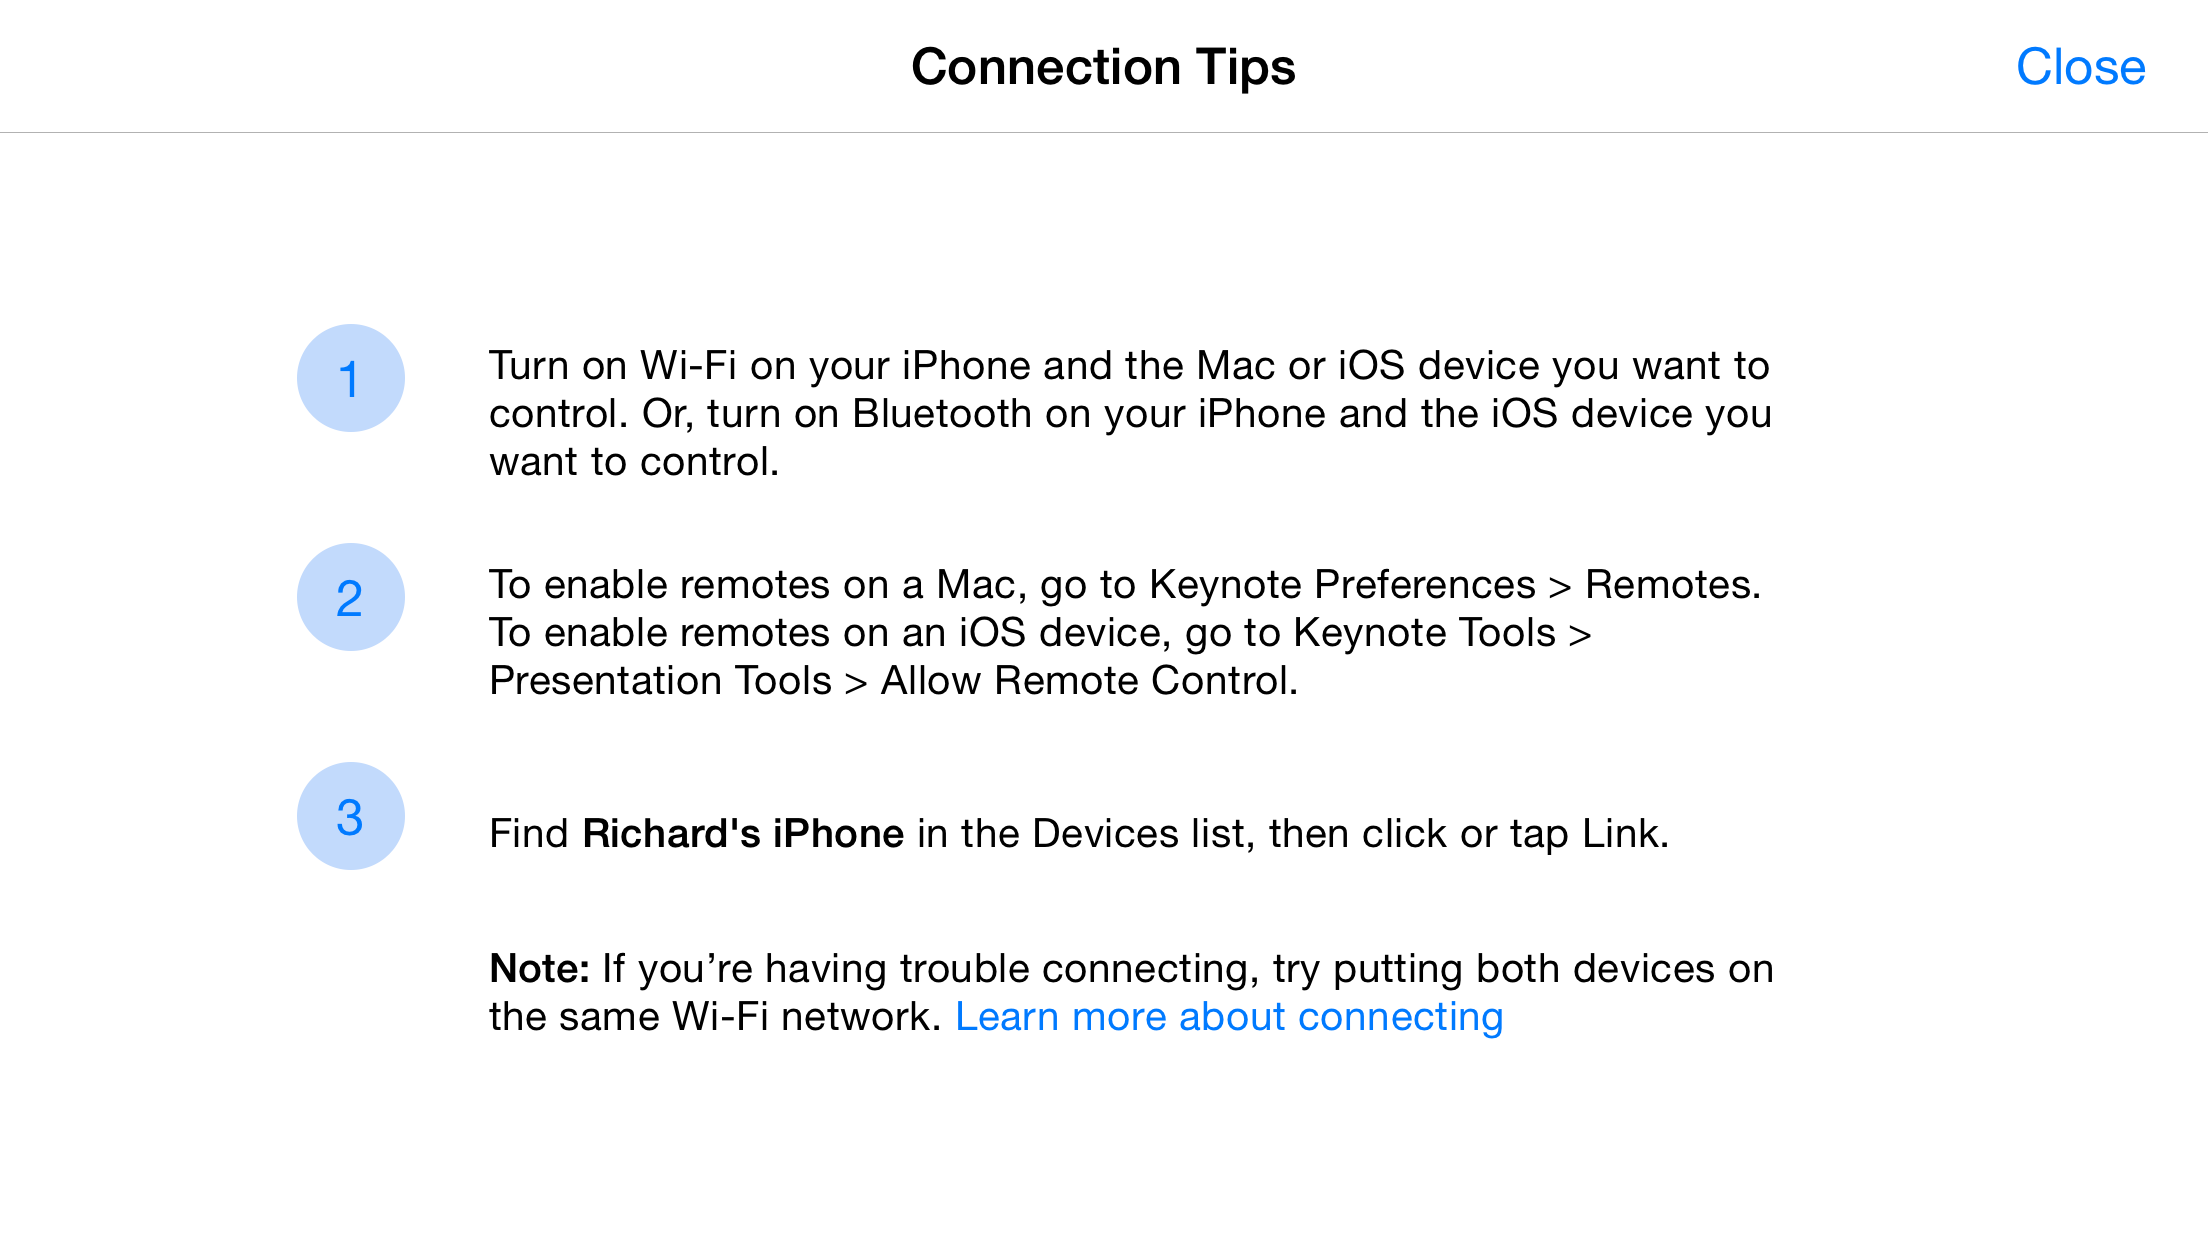
From here the application will welcome you and give you some extra details which you can step through in the images below. You'll hit "continue" which takes you to the waiting to pair screen. (A tip image is shown so you can see the extra instructions Apple provides you!).
Step 4: Pair on the Mac
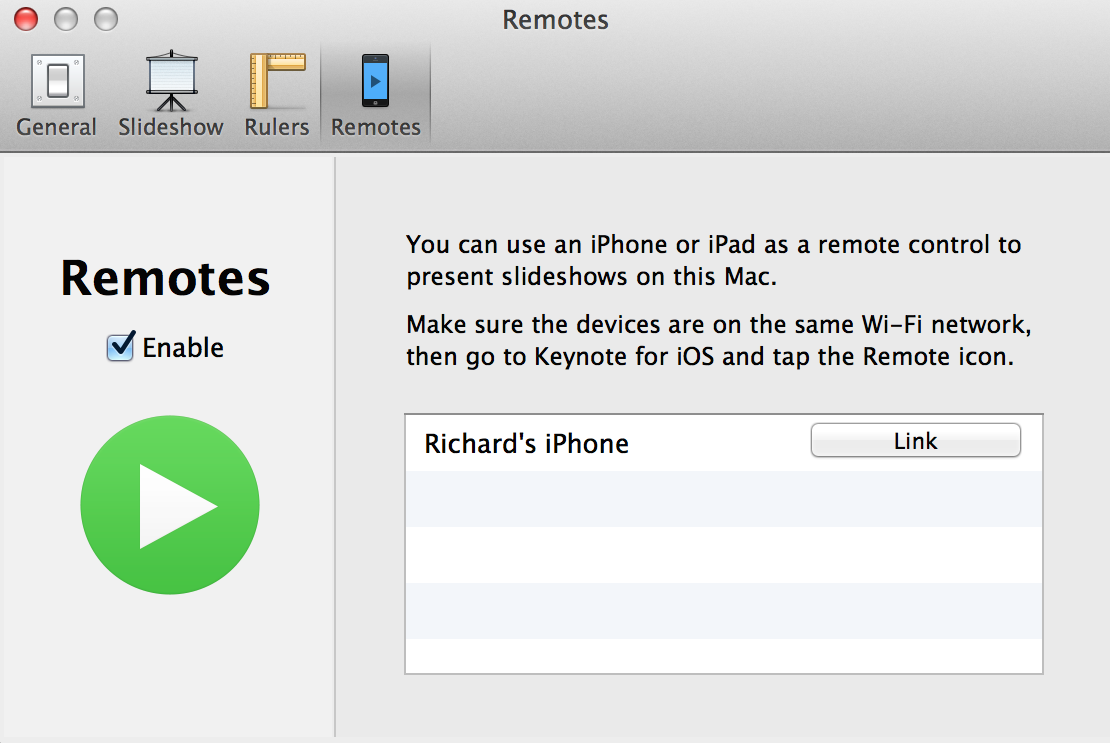
Now, go back to your Mac OS X machine and open up the Keynote preferences. There you'll see a "Remotes" tab. Enable it using the checkbox next to "Enable" and wait for your iOS device name to appear in the list. Then click on "Link".
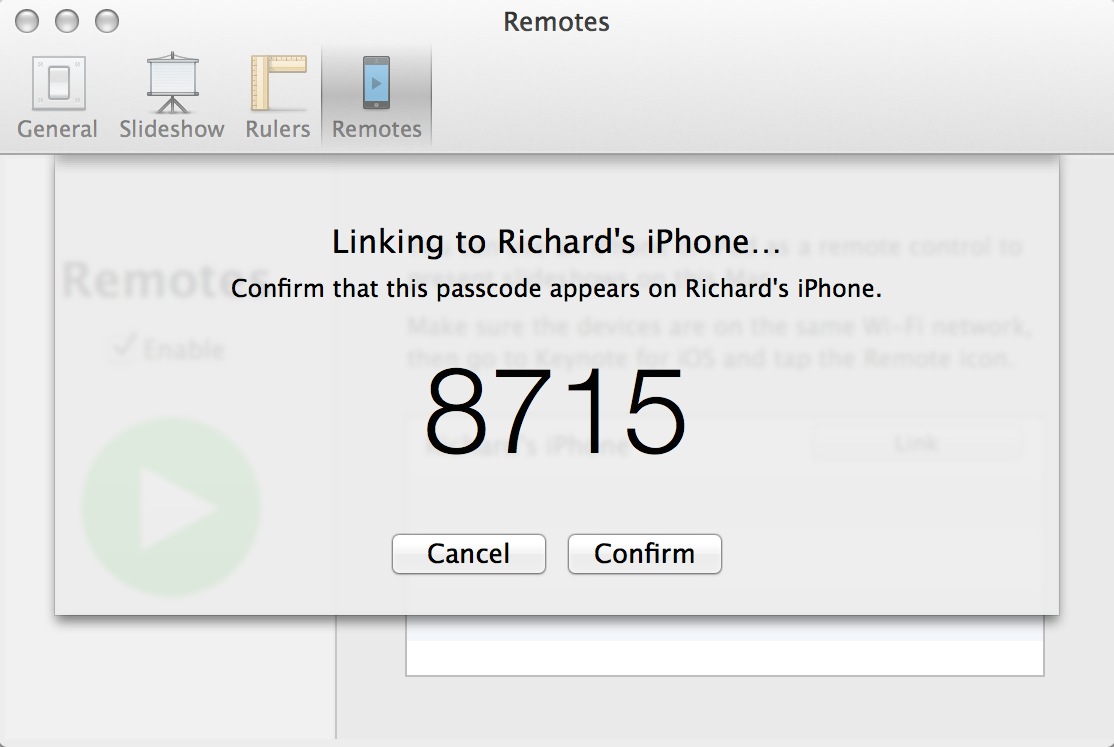
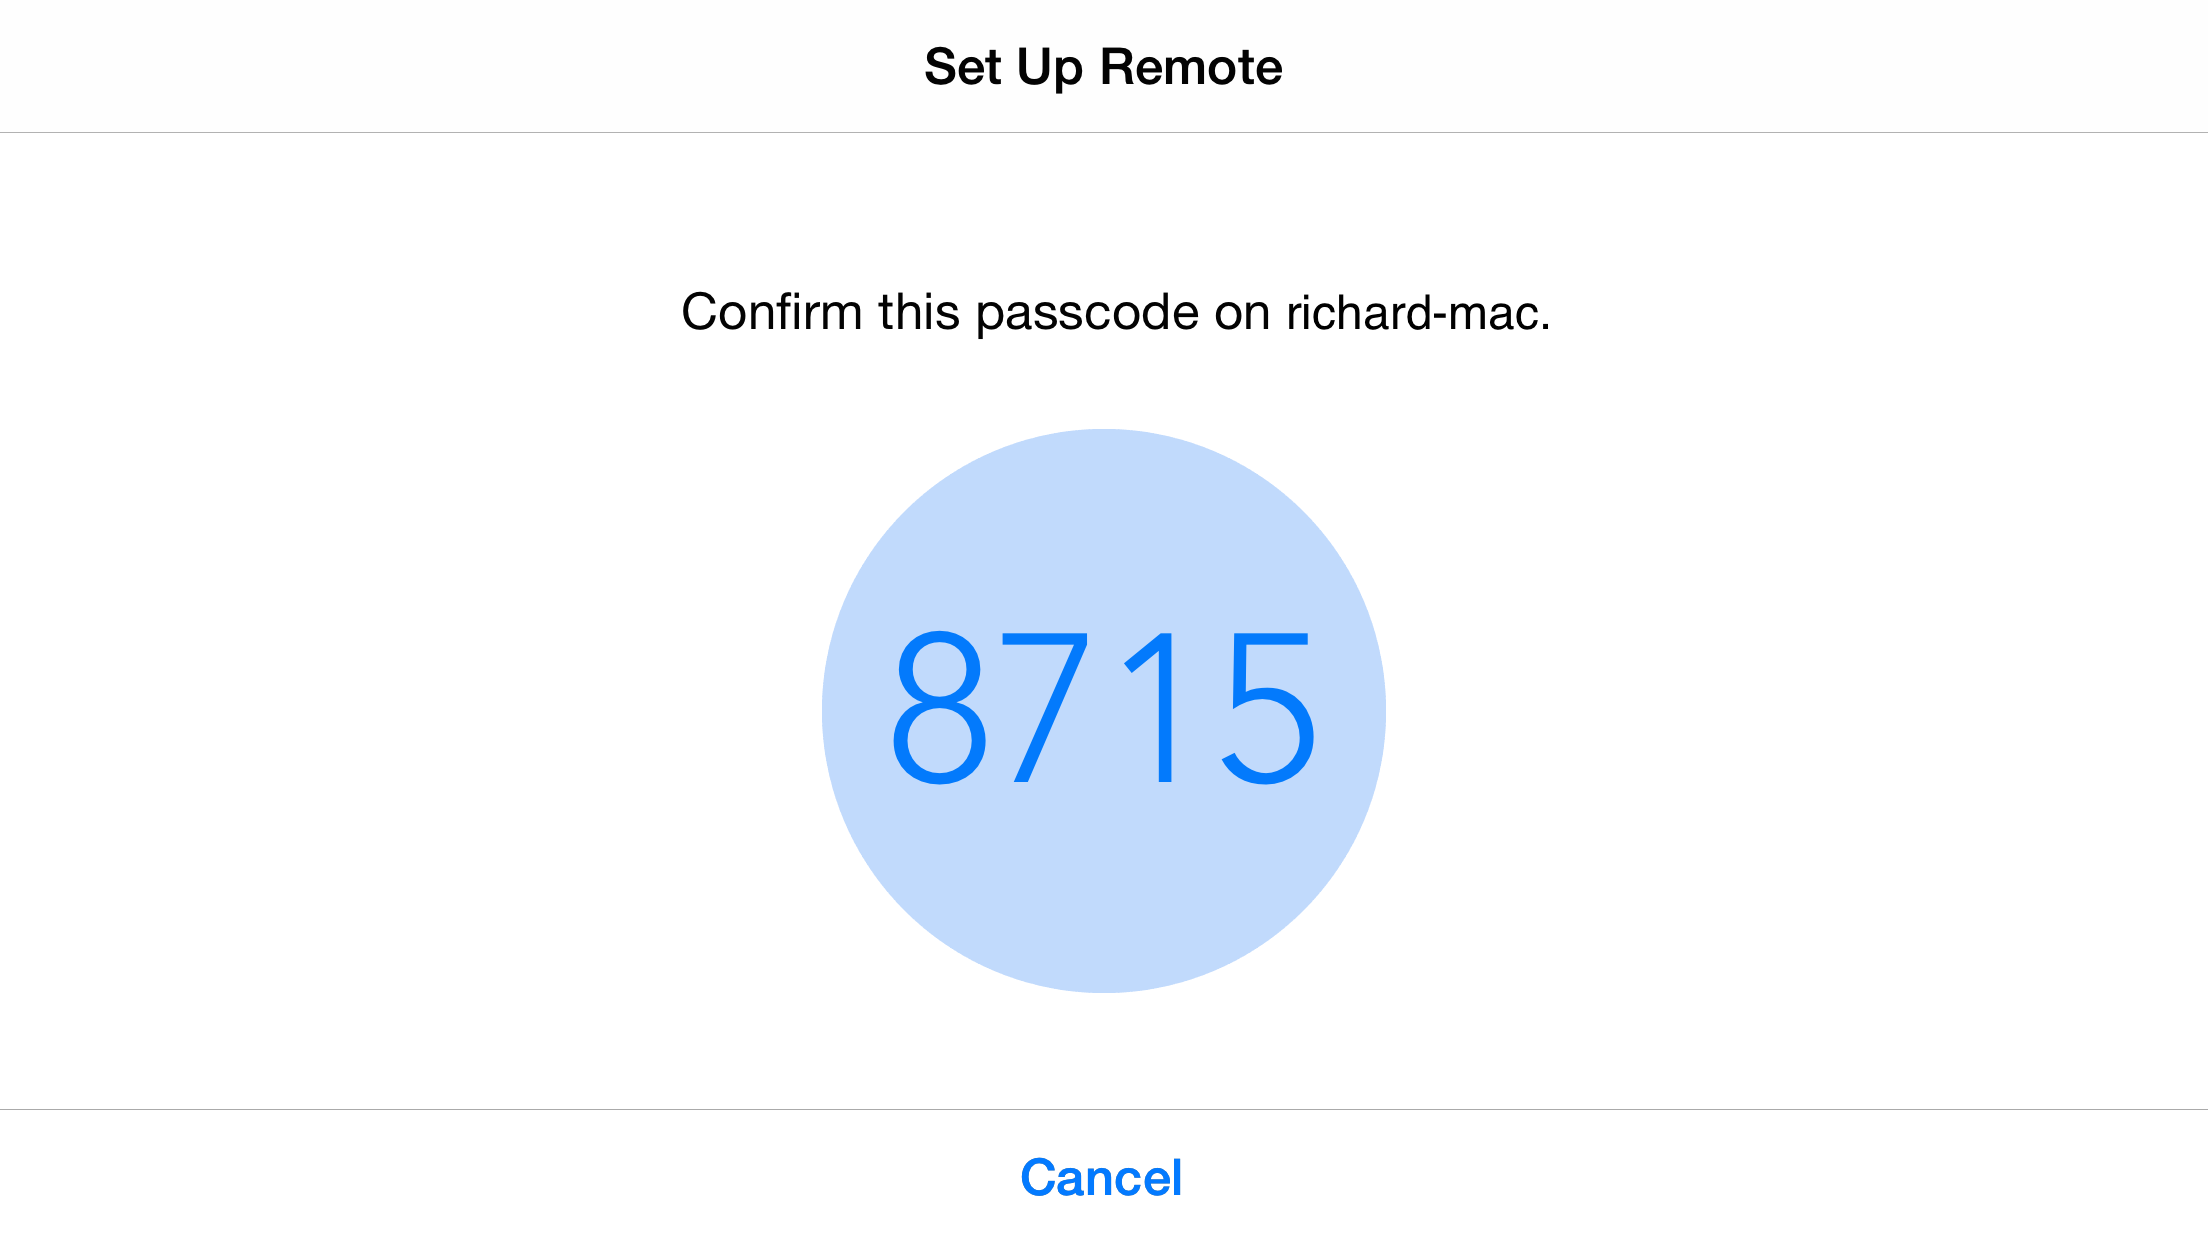
A passcode should appear on both your Mac OS X machine and your iOS device as in the images below. Confirm the code and hit "Confirm" on the Mac OS X machine.
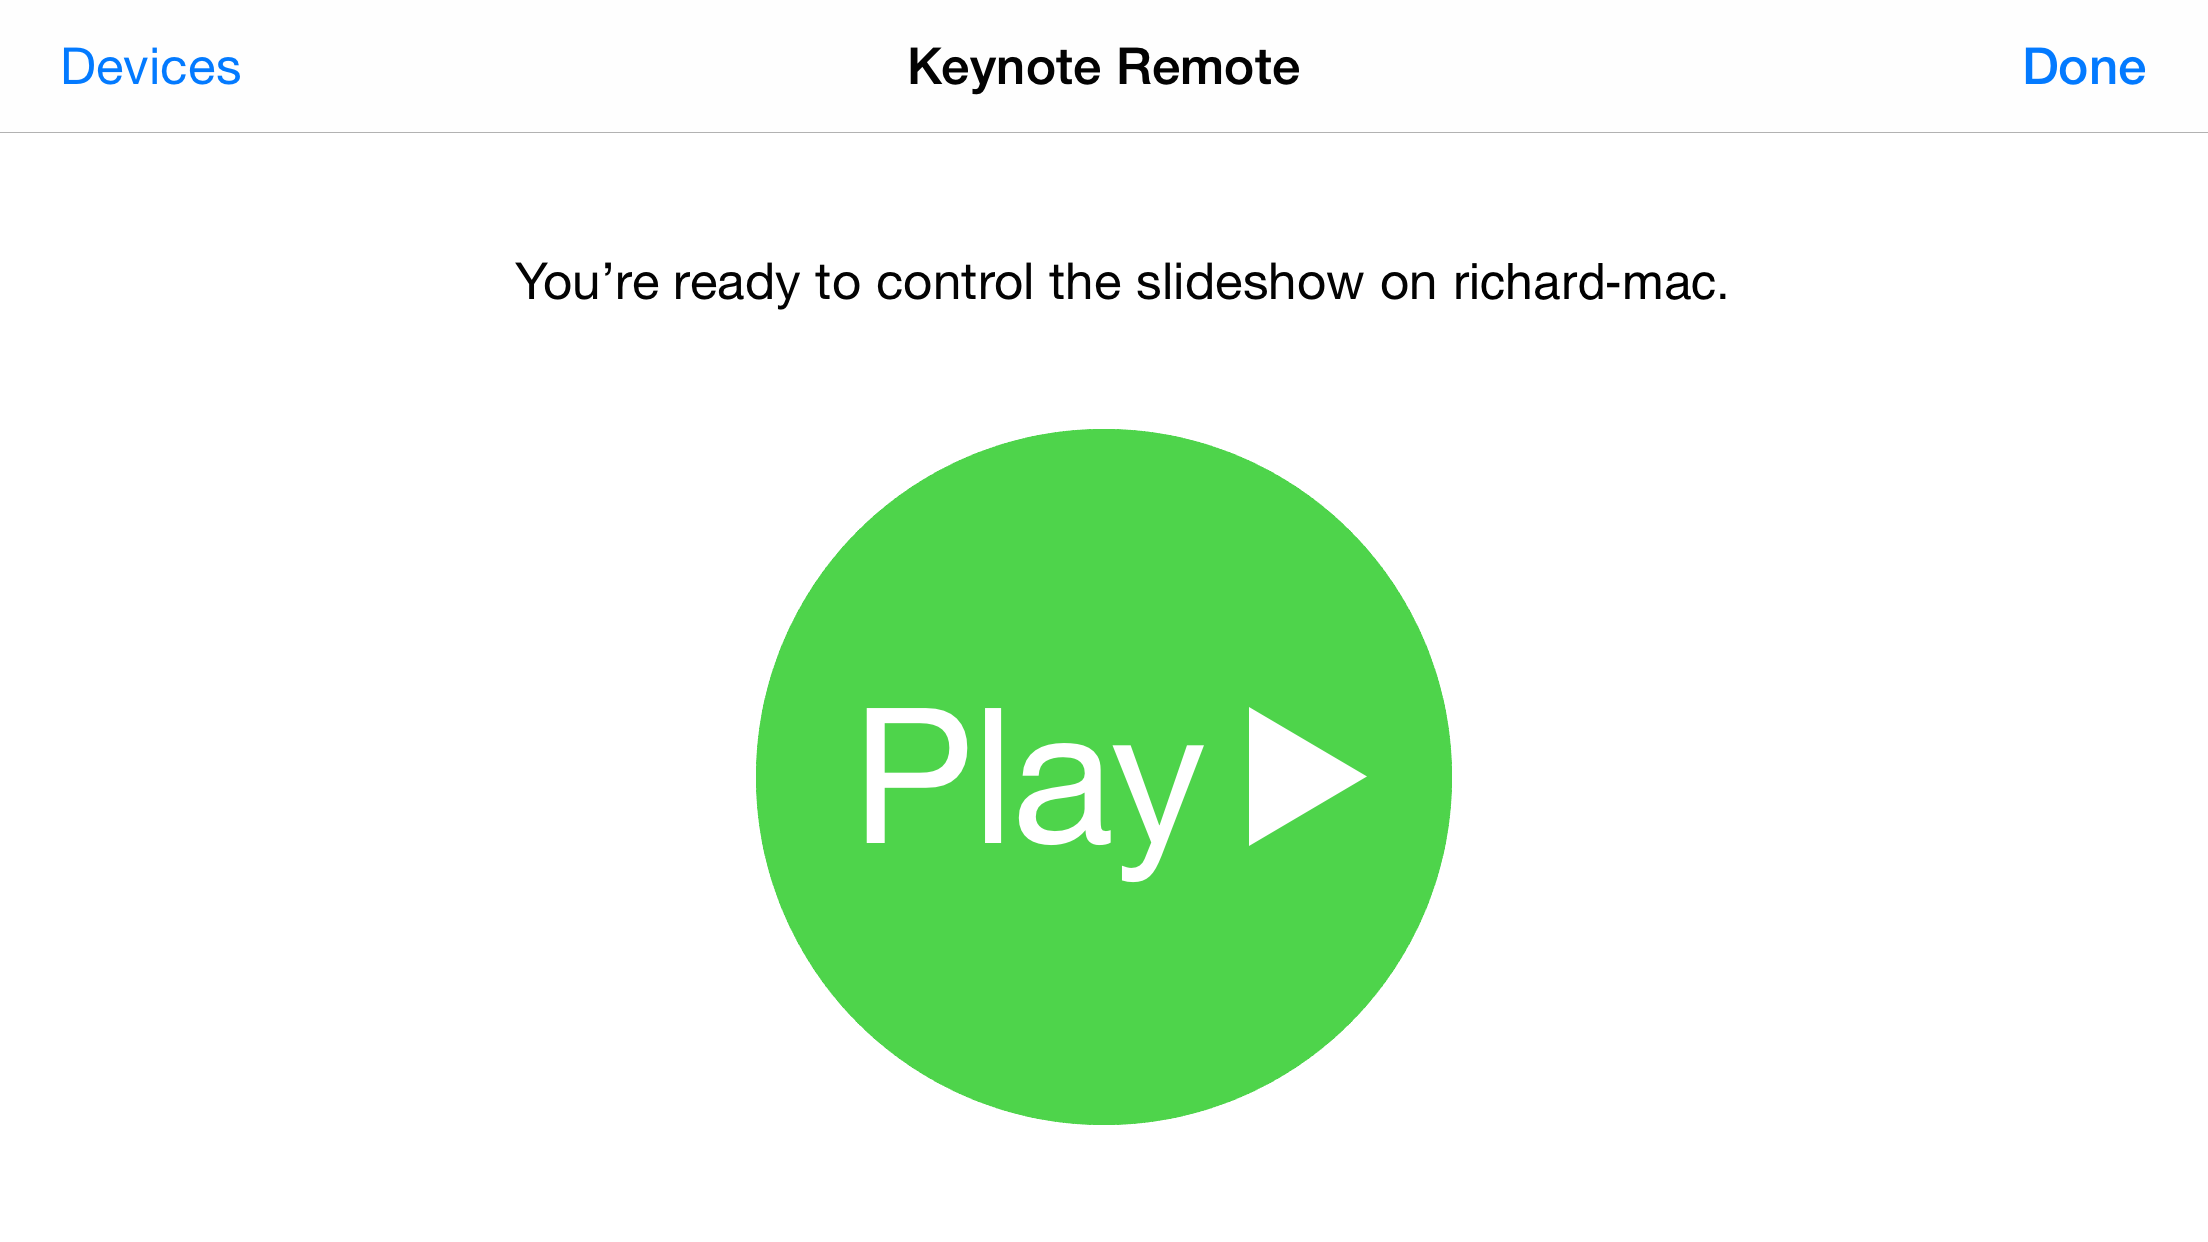
Step 5: Play the Presentation
At this point if you've successfully linked the two devices, you should see a big play button on your Keynote Remote on your iOS device! Now you can present using your iOS device as the remote!
It's super awesome and smooth! It even gives you the options of seeing the current and next slide, or the current slide and notes, or the next slide, etc. And the most fun feature is the mock laser pointer it provides! I love this feature because it allows remote users to see what I am pointing at and not just those in the audience for the presentation!
Conclusion
I hope you learned from this tutorial in setting up Keynote Remote on your iOS device for your Mac OS X Keynote presentation! If anything was unclear, please let me know and I can fix it! Otherwise, good luck with your presentations!
Quick Tip
If you have multiple machines or devices. Or for whatever reason the presentation isn't working. You can always reset things and try again. (That solved my issue once). To remove the connection in the Keynote Remote, just hit the "Devices" button in the top left corner of the Keynote Remote application. It'll list the devices you have connected to and you can delete it by swiping the item to the left and hitting "Delete".
comments powered by Disqus